WordPressのテーマをブロックテーマに移行するにあたり、簡単なカスタムブロックのプラグインを書きました。
WordPress のクラシックテーマ(従来の PHP を使って作るテーマ)では、多少の不都合は PHP による力業で解決していたものですが、現在のブロックテーマはだいぶモダンなスタイルに変わりました。
その名の通り、「ブロック」という部品を積み上げてテーマを構築するノーコードなスタイルで、プログラミングに疎い人でもテーマをカスタマイズできるようになりました。
その一方で、既存のブロックにはない機能を求めると途端にブロック開発に手を染める必要に迫られる諸刃の剣でもあります。
クラシックテーマだったら当該部分に直接 PHP のコードをたたき込んで解決することができたのですが、ブロックテーマではこの部分だけちょっとという解決の仕方が使えないのです。今回作成するソーシャルブックマークボタンもそういうもののひとつです。
たとえばクラシックテーマだったら single.php に直で
$encoded_title = urlencode( get_the_title( $post_id ) );
$encoded_url = urlencode( get_the_permalink( $post_id ) );
echo '<a href="https://twitter.com/share?url=' . $encoded_url .
  '&text=' . $encoded_title . '&via=icoro&related=icoro"' .
  'rel="nofollow noopener" target="blank" class="share-tw">Twitter</a>';
とでも書けばよかったのですが、同じことをブロックテーマで実現するには「ソーシャルブックマークボタンを表示するブロック」を開発する必要に迫られるのです。
もしかしたらそのうち変数を扱えるブロックとか条件分岐できるブロックとかが出てくるのかもしれませんが、今のところ、そういった機能を有したブロックは見当たりません。
今回作るカスタムブロック
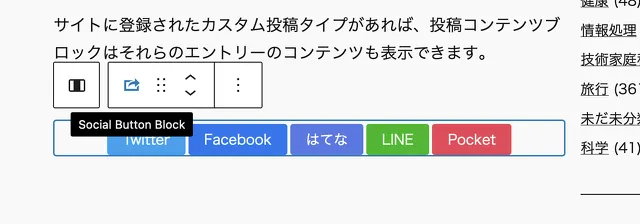
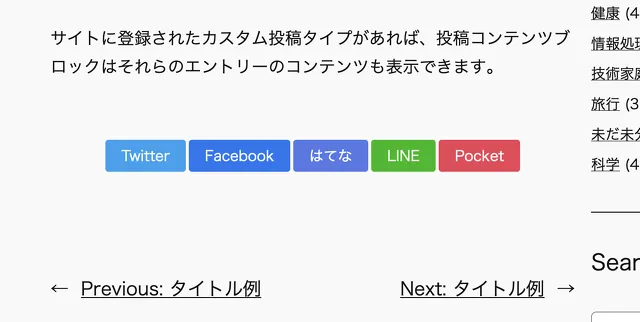
今回作成するのはソーシャルブックマークのボタンを表示するだけのブロックです。ウェブページを Twitter に投稿とか Facebook でシェアするやつ。
PHP(サーバサイド)で出力を構築して、それをそのままフロント(ウェブサイト)に表示する「ダイナミックブロック」という型式のブロックを作成します。主要な処理は PHP 側に書くので、いままで PHP をゴリゴリ書いてテーマやプラグインを作ってた人にも比較的とっつきやすいのではないかと思います。
1. 開発環境の構築
1.1. node.js のインストール
そう、テキストエディタひとつでごりごりPHPのコードを書けばよかった時代は遠い過去になり、ついに WordPress でも node.js を使う時代がやってきました。
この方法にはメリットもデメリットもありますが、しかし、我々末端のユーザに選択肢はなく、ただ示されたルールに従うしかありません。進め。林の中の象のように。
Mac 環境に node.js をインストールする方法は以下にまとめました。
1.2. WordPressのローカル実行環境を立ち上げる
ブロック開発を進めるにあたり、ローカルのWordPress環境が必要になります。
公式のチュートリアルでは開発環境として docker を利用した wp-env が紹介されています。
- WordPress プラグイン – Japanese Team
https://ja.wordpress.org/team/handbook/block-editor/getting-started/create-block/wp-plugin/
ただ docker にあんまりなじみがない人は local by flywheel のほうが簡単だと思います。テーマとかプラグイン開発とかですでに使ってる人も多いかも。
- Local – Local WordPress development made simple
https://localwp.com/
以上、node.js と WordPress のローカル実行環境が整ったら、ブロック開発のための準備は完了です。
2. ブロック開発のひな形を作る
ここからカスタムブロックの開発に入ります。最初は開発に必要なひな形一式を生成するところから。
2.1. @wordpress/create-block
ローカルに立てた WordPress のプラグインディレクトリに移動し、create-block コマンドを実行します。今回は「social-button-block」という slug (名前)でプラグインを作成します。
create-block コマンドを実行するとプラグインディレクトリ下に slug と同じ名前のディレクトリが作られます。プラグイン用のディレクトリをわざわざ mkdir する必要はありません。
# ローカルに立てたWordPressのプラグインディレクトリに移動
# /path/to/wordpress は wordpress のインストールされてるディレクトリパス
% cd /path/to/wordpress/public/wp-content/plugins

# create-block を実行してファイル一式を生成
% npx @wordpress/create-block social-button-block
Need to install the following packages:
@wordpress/create-block@4.31.0
Ok to proceed? (y)

Creating a new WordPress plugin in the social-button-block directory.

Creating a "block.json" file.

Creating a "package.json" file.

Installing `@wordpress/scripts` package. It might take a couple of minutes...

Formatting JavaScript files.

Compiling block.

Done: WordPress plugin Social Button Block bootstrapped in the social-button-block directory.

You can run several commands inside:

  $ npm start
    Starts the build for development.

  $ npm run build
    Builds the code for production.

  $ npm run format
    Formats files.

  $ npm run lint:css
    Lints CSS files.

  $ npm run lint:js
    Lints JavaScript files.

  $ npm run plugin-zip
    Creates a zip file for a WordPress plugin.

  $ npm run packages-update
    Updates WordPress packages to the latest version.

To enter the directory type:

  $ cd social-button-block

You can start development with:

  $ npm start

Code is Poetry
出力結果にあるように、最初から start, build, lint などのコマンドが使えるようになっています。
2.1.1. 生成されたファイルの構成
生成されたファイル一式の概要は以下の通り。
social-button-block/
- build/
- node_modules/
- src/
- block.json
- edit.js
- editor.scss
- index.js
- save.js
- style.js
- style.scss
- view.js
- .editorconfig
- .gitignore
- package-lock.json
- package.json
- readme.txt
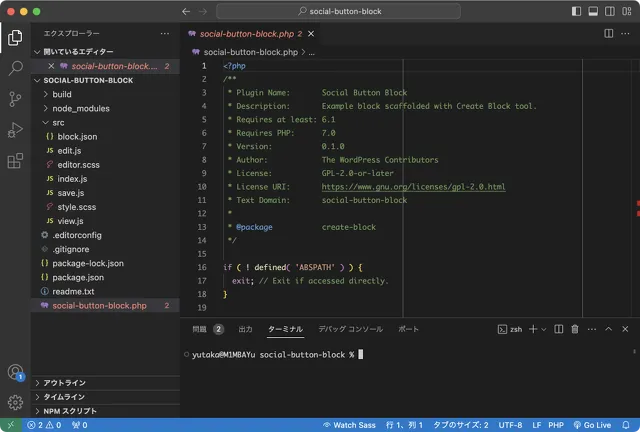
- social-button-block.php 主に編集することになるのは social-button-block.php と src ディレクトリの中身です。
node_modules ディレクトリは node.js 関連のファイルが、build ディレクトリは src を元にして build されたファイルが入ります。このへんのファイルに自分で手を入れることはほぼありません。
2.1.2. visual studio code便利
ブロック開発ではちょいちょいターミナルをいじることになるので、コーディングもターミナルも1画面に収まってる vscode (visual studio code) が便利です。ディレクトリごと vscode のアイコンにドラッグ&ドロップすると vscode 内のターミナルが初めからそのディレクトリに移動した状態になるので、そのあたりもとてもラクです。
2.2. npm start
コーディングをはじめる前にターミナルで npm start を実行します。実行しておくと Typescript や SCSS のコンパイルなどなどを自動的にしてくれます。止めるときは Ctr + C 。
social-button-block % npm start別に実行しなくてもコーディング自体はできますが、これをしておくとリアルタイムにコンパイルを実行してくれるので、WordPressで実際に動作を確認しながらコーディングできます。
似たようなコマンドに npm run build があります。npm start との違いはだいたい以下のような感じ。
buildはコマンドを実行したときだけコンパイルを行う。startはファイルを編集すると(ほぼ)リアルタイムでコンパイルを行う。buildはソースコード中のコメントなどが消されてコンパクトになったコードが出力される。startはコンパイルが必要な部分以外はおおむねそのまま出力される。
start は開発用、build は本番用という理解で問題ないと思います。
3. コーディング
やっとコーディングです。
3.1. src/index.js
まずは src/index.js から。
/**
 * Registers a new block provided a unique name and an object defining its behavior.
 *
 * @see https://developer.wordpress.org/block-editor/reference-guides/block-api/block-registration/
 */
import { registerBlockType } from '@wordpress/blocks';

/**
 * Lets webpack process CSS, SASS or SCSS files referenced in JavaScript files.
 * All files containing `style` keyword are bundled together. The code used
 * gets applied both to the front of your site and to the editor.
 *
 * @see https://www.npmjs.com/package/@wordpress/scripts#using-css
 */
import './style.scss';

/**
 * Internal dependencies
 */
import Edit from './edit';
//import save from './save'; // コメントアウト
import metadata from './block.json';
import ServerSideRender from '@wordpress/server-side-render'; //追加
import { useBlockProps } from '@wordpress/block-editor';

/**
 * Every block starts by registering a new block type definition.
 *
 * @see https://developer.wordpress.org/block-editor/reference-guides/block-api/block-registration/
 */
registerBlockType( metadata.name, {
	/**
	 * @see ./edit.js
	 */
	edit: Edit,

	/**
	 * @see ./save.js
	 */
	//save, // コメントアウト
} );
ざっくり言うと registerBlockType の中の edit はバック(管理画面)側の表示、save はフロント(ウェブサイト)側の表示を担当しています。
今回のように PHP (サーバサイド)で出力した内容をそのままフロントに表示する「ダイナミックブロック」を作る場合は Javascript を使用しないので save のところで null を返すようにします。単純にコメントアウト、もしくは削除してしまってもいいみたいです。
- ダイナミックブロックの作成 – Japanese Team – WordPress.org 日本語
https://ja.wordpress.org/team/handbook/block-editor/how-to-guides/block-tutorial/creating-dynamic-blocks/
ここでは変化がわかりやすいように単純に save 周りをコメントアウトしました。
またサーバサイドレンダリングを利用するので ServerSideRender を import しています。
そのほかは最初から記述されている内容です。
3.2. social-button-block.php
social-button-block.php にソーシャルボタンを表示するコードを記述します。
create-block をした時点で大枠はできているので、ほとんどロジックを書くだけで終わりです。
<?php
/**
 * Plugin Name:       Social Button Block
 * Description:       Example block scaffolded with Create Block tool.
 * Requires at least: 6.1
 * Requires PHP:      7.0
 * Version:           0.1.0
 * Author:            The WordPress Contributors
 * License:           GPL-2.0-or-later
 * License URI:       https://www.gnu.org/licenses/gpl-2.0.html
 * Text Domain:       social-button-block
 *
 * @package           create-block
 */

if ( ! defined( 'ABSPATH' ) ) {
	exit; // Exit if accessed directly.
}

/**
 * ソーシャルブックマークを出力する
 * @param Array $attributes
 * @param String $content
 * @param $block
 * @reference
 * editor - Gutenberg dynamic block render_callback gives null for $post - WordPress Development Stack Exchange
 * https://wordpress.stackexchange.com/questions/391406/gutenberg-dynamic-block-render-callback-gives-null-for-post
 */
function render_social_button_block( $attributes, $content, $block ) {

  # ツイ垢をハードコーディングしてるので、適当に修正してください。
  $tw_acc = "icoro";
	$wrapper_attributes = get_block_wrapper_attributes();

	$tw_href = "";
	$fb_href = "";
	$hb_href = "";
	$ln_href = "";
	$pk_href = "";

	if ( isset( $block->context['postId'] ) ) {
		$post_id = $block->context['postId'];

		$encoded_title = urlencode( get_the_title( $post_id ) );
		$encoded_url = urlencode( get_the_permalink( $post_id ) );

		$tw_href = "href=\"https://twitter.com/share?url={$encoded_url}&text={$encoded_title}&via={$tw_acc}&related={$tw_acc}\"";
		$fb_href = "href=\"http://www.facebook.com/share.php?u={$encoded_url}\"";
		$hb_href = "href=\"http://b.hatena.ne.jp/add?mode=confirm&url={$encoded_url}&title={$encoded_title}\"";
		$ln_href = "href=\"https://social-plugins.line.me/lineit/share?url={$encoded_url}\"";
		$pk_href = "href=\"http://getpocket.com/edit?url={$encoded_url}&title={$encoded_title}\"";
	}

	$bookmark =
		"<ul {$wrapper_attributes}>" .
		"<li><a {$tw_href} rel=\"nofollow noopener\" target=\"blank\" class=\"share-tw\">Twitter</a></li>" .
		"<li><a {$fb_href} rel=\"nofollow noopener\" target=\"blank\" class=\"share-fb\">Facebook</a></li>" .
		"<li><a {$hb_href} rel=\"nofollow noopener\" target=\"blank\" class=\"share-hb\">はてな</a></li>" .
		"<li><a {$ln_href} rel=\"nofollow noopener\" target=\"blank\" class=\"share-ln\">LINE</a></li>" .
		"<li><a {$pk_href} rel=\"nofollow noopener\" target=\"blank\" class=\"share-pk\">Pocket</a></li>" .
		"</ul>";

	return $bookmark;
}

/**
 * Registers the block using the metadata loaded from the `block.json` file.
 * Behind the scenes, it registers also all assets so they can be enqueued
 * through the block editor in the corresponding context.
 *
 * @see https://developer.wordpress.org/reference/functions/register_block_type/
 */
function social_button_block_social_button_block_block_init() {
	register_block_type( __DIR__ . '/build',
    // 配列を追加
    array(
			'uses_context' => [ 'postId' ],
			'render_callback' => 'render_social_button_block'
		)
	);
}
add_action( 'init', 'social_button_block_social_button_block_block_init' );
ここでは 実際にブックマークを出力する render_social_button_block 関数を追加し、それをコールバック関数として social_button_block_social_button_block_block_init 関数に登録しています。
基本的にはクラシックテーマの function.php に書くコードと大きな違いはありません。WordPress の関数もほぼそのまま使えます。ただ global $post は使えないので、ここでは post ID を取得するために context を利用しています。
っていうか、あとで気づいたんだけど get_post 関数使えた。まあ、context の使い方がわかったということで。
3.3. src/block.json
上では register_block_type に 'uses_context' => [ 'postId' ] を書いていますが、次のように src/block.json に "usesContext": [ "postId" ] を書いても同じことのようです。
{
	"$schema": "https://schemas.wp.org/trunk/block.json",
	"apiVersion": 3,
	"name": "create-block/social-button-block",
	"version": "0.1.0",
	"title": "Social Button Block",
	"category": "widgets",
	"icon": "share-alt2", //"smiley" から変更
	"description": "Example block scaffolded with Create Block tool.",
	"example": {},
	"supports": {
		"html": false
	},
	"usesContext": [ "postId" ], //追加
	"textdomain": "social-button-block",
	"editorScript": "file:./index.js",
	"editorStyle": "file:./index.css",
	"style": "file:./style-index.css",
	"viewScript": "file:./view.js"
}
src/block.json に usesContext を記述した場合、register_block_type に uses_context を書く必要はありません。block.json に記述するほうがスマートかも?
function social_button_block_social_button_block_block_init() {
	register_block_type( __DIR__ . '/build', array(
			//'uses_context' => [ 'postId' ], // コメントアウトできる
			'render_callback' => 'render_social_button_block'
		)
	);
}
ちなみに大抵の情報は $block を参照すると取得できるのですが、この postId のほか、postType や queryId などは直接取得することができません。(理由はよくわかりません。)以下は $block を var_dump した一部です。available_context が protected となっています。
["available_context":protected]=>
  array(2) {
    ["postId"]=>
    int(12472)
    ["postType"]=>
    string(4) "post"
  }
これらの情報を取得したい場合は block.json に usesContext を記述するか、PHPに uses_context を記述する必要があります。
3.3.1. ブロックのアイコン
block.json を開いたついでにアイコンも好みのものに変えましょう。icon には Dashicon が使えます。
- Dashicons | WordPress Developer Resources
https://developer.wordpress.org/resource/dashicons/
3.4. src/edit.js
ここまででフロントにソーシャルボタンを表示する機能はほぼ完成しています。(CSS とかは設定してないのでリンクがリスト表示されるだけ。)
ただ、このままだとバック側では Gutenberg でブロックを追加しても「Basic Block – hello from the editor!」というテキストが表示されるだけです。フロントとバックで同じ見た目のものが表示されるほうがわかりやすいので、バック側でもサーバサイドレンダリングされた出力を表示するように書き換えます。
と言っても ServerSideRender を import し、Edit 関数が return する内容を書き換えるだけです。
/**
 * Retrieves the translation of text.
 *
 * @see https://developer.wordpress.org/block-editor/reference-guides/packages/packages-i18n/
 */
import { __ } from '@wordpress/i18n';

/**
 * React hook that is used to mark the block wrapper element.
 * It provides all the necessary props like the class name.
 *
 * @see https://developer.wordpress.org/block-editor/reference-guides/packages/packages-block-editor/#useblockprops
 */
import { useBlockProps } from '@wordpress/block-editor';

/**
 * Lets webpack process CSS, SASS or SCSS files referenced in JavaScript files.
 * Those files can contain any CSS code that gets applied to the editor.
 *
 * @see https://www.npmjs.com/package/@wordpress/scripts#using-css
 */
import './editor.scss';

import ServerSideRender from '@wordpress/server-side-render'; //追加

/**
 * The edit function describes the structure of your block in the context of the
 * editor. This represents what the editor will render when the block is used.
 *
 * @see https://developer.wordpress.org/block-editor/reference-guides/block-api/block-edit-save/#edit
 *
 * @return {Element} Element to render.
 */
export default function Edit( props ) {
	const blockProps = useBlockProps();
	return (
		<div { ...useBlockProps() }>
			<ServerSideRender
				block={ props.name }
				attributes={ props.attributes }
			/>
		</div>
	);
}
Edit 関数の引数 props の中身には block.json と同じ内容が入っています。index.js には特に書いてないのですが、なんか勝手に読み込んでくれるみたいです。
3.5. src/style.scss
おまけでボタン周りのCSS。src/style.scss に以下のように記述します。完全に見た目だけの問題なので、好きなように書き換えてください。
/**
 * The following styles get applied both on the front of your site
 * and in the editor.
 *
 * Replace them with your own styles or remove the file completely.
 */
.wp-block-create-block-social-button-block {
	margin: 3em 0;
	padding: 0;
	line-height: 2em;
	text-align: center;

	li {
		display: inline;
		line-height: 0;
		font-size: 0;
		margin:0;
		&:not(:first-child) {
			margin-left: 3px;
		}
	}

	a {
		display: inline-block;
		padding: 1rem;
		border-radius: 3px;
		background-color: #bbb;
		font-size: 0.9rem;
		color: #fff;
		text-decoration: none;
	}

	a.share-tw { background: #1DA1F2; }
	a.share-fb { background: #1877f2; }
	a.share-hb { background: #5279E7; }
	a.share-ln { background: #00B900; }
	a.share-pk { background: #ee4056; }
}
3.6. src/editor.scss
src/editor.scss も編集。デフォルトだと管理画面側でブロックを表示したときにブロックが赤い点線で囲まれるようになっているので、これをコメントアウトします。
/**
 * The following styles get applied inside the editor only.
 *
 * Replace them with your own styles or remove the file completely.
 */

//.wp-block-create-block-social-button-block {
//	border: 1px dotted #f00;
//}
src/edit.js の中にある editor.scss を import してる行をコメントアウトしてもOK。なんかあとで使いそうだなという予感があるなら残しておいてもOK。
以上です。動作確認してうまく動いていそうなら完成です。
4. 本番環境にインストールする
完成したカスタムブロックはそのままだとクソデカ node_modules やごちゃごちゃ src など、本番環境では不要なファイルを多分に含んでいます。
以下のコマンドを実行すると余計なものをそぎ落として zip したカスタムブロックのファイルを作ってくれます。
% npm run plugin-zip出力された zip を解凍して、本番環境のプラグインディレクトリに放り込めばOKです。乙です。
GitHubにあげました
GitHubにファイル一式アップしました。参考にどうぞ。
- icorokamoto/social-button-block: ソーシャルブックマークのボタンを表示するWordPressのカスタムブロック
https://github.com/icorokamoto/social-button-block
")
作って学ぶ WordPress ブロックテーマ (Compass Web Development)
- メーカー:マイナビ出版
- カテゴリ:単行本(ソフトカバー)
- 発売日:2023/01/31